A damaged door frame can show several problems at once. Before requesting door frame repair in Escondido, document each visible issue and how the door moves. That gives a local professional a clearer starting point without asking you to diagnose the cause.
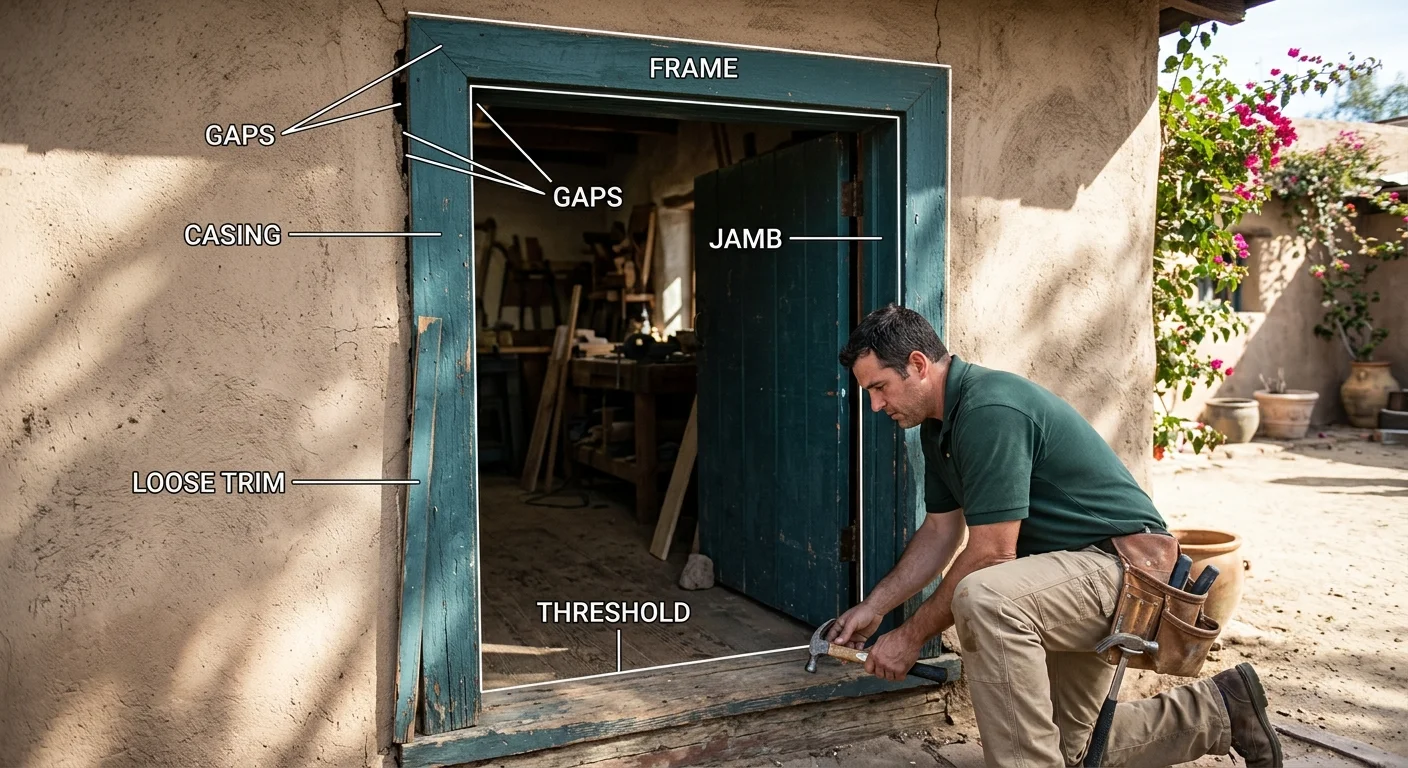
Identify the frame, jamb, casing, and threshold
Start by naming the part that looks damaged. “Door frame” often becomes a catch-all phrase during a repair request. A few simple labels can make your description much clearer.
The door itself is the moving panel. You may also hear a professional call it the door slab. The jambs are the upright surfaces along both sides of that panel. The head jamb runs across the top. Together, these pieces form the frame around the door.
Casing is the visible trim covering the joint between the frame and wall. It usually faces into the room, hallway, or exterior entry area. Loose, cracked, or separated casing isn’t automatically the same problem as damage within the jamb.
The threshold sits across the bottom of an exterior opening. Interior doors may have flooring beneath them instead. Record what you see rather than assigning the problem to a hidden component.
Stand back and inspect the entire opening. Note whether the visible issue is on the hinge side, latch side, top, or bottom. Record whether it appears on one face or both. Include the room name and whether it’s an interior or exterior door.
Material also matters when describing the request. Note whether the visible surface appears to be painted wood, stained wood, metal, or vinyl. If you aren’t sure, say that directly. A clear photo lets the professional assess it.
Fix Pro San Diego can connect you with an independent local professional for door and window repair. We provide the match and don’t perform the physical work.
Record rubbing, gaps, cracks, and loose trim
Inspect the closed door first. Look around its top and both sides without pressing or pulling it. Record any place where the space between the door and jamb looks noticeably different.
Describe each spot by location. “The upper latch-side corner has a narrow gap” is more useful than “the frame looks crooked.” Use the same approach for rubbing. Note the exact edge and the point where contact begins.
Next, inspect every visible face of the frame. Look for cracks, splits, dents, missing pieces, peeling surfaces, or open joints. Don’t guess what caused them. Several visible conditions can look alike in a photograph.
Check the casing separately. Place your fingers lightly against it and note any section that already moves. Don’t pull it away from the wall. Record whether the separation follows one short section or continues around a corner.
At an exterior doorway, include the threshold in your notes. Photograph any visible gap, bent edge, loose section, or worn surface. Describe what’s present without labeling the underlying cause.
Small pieces of removable painter’s tape can help identify locations in photographs. Number the tape pieces, then match those numbers to your written notes. Avoid placing tape over loose finishes or damaged edges.
Your list might read:
- Spot 1: rubbing at the upper hinge-side edge
- Spot 2: open joint above the latch
- Spot 3: loose casing near the lower corner
- Spot 4: visible gap along the threshold
This record keeps separate symptoms from becoming one vague repair request. It also helps the professional ask focused questions before defining the work.
Check whether the door still opens and closes
Movement tells part of the story, but it doesn’t identify the cause. Operate the door as you normally would and record what happens at each stage.
Begin with the door fully open. Move it toward the frame slowly. Note the first place where motion changes. The door might rub before reaching the frame, contact one corner, or reach the frame without latching.
Next, record how the latch behaves. Does it enter the strike opening without added pressure? Does the door need lifting, pushing, or pulling before it stays closed? Write down the action rather than guessing which component needs repair.
Check the door from both sides when possible. A problem can be easier to see from the hallway than from inside the room. Record whether the issue changes when the door moves in either direction.
Also note how far the door opens. Nearby furniture, floor coverings, or wall-mounted items can limit the movement available during inspection. Move only ordinary items you can handle comfortably. Include fixed obstacles in your photos so the professional can plan around them.
Avoid repeatedly pushing past the point where movement stops. One careful observation is enough for your repair notes. If the door won’t move through its usual range, say exactly where it stops.
A door that sticks can overlap with several repair topics. Our guide to documenting a sticking door covers movement checks in more detail. For this request, keep the focus on what happens at the frame and where contact appears.
Separate hardware trouble from frame damage
Hardware and frame conditions can appear together. Document them separately so the professional can decide what belongs within the repair scope.
Start with the hinges. Photograph each hinge with the door open, including its connection to the door and jamb. Note visible gaps around the hinge plates. Record any screw that’s missing, raised, or turning without tightening. Don’t remove the hinge to inspect behind it.
Then check the latch and strike plate. Photograph them straight on rather than at a sharp angle. Note whether the latch meets the opening, lands above it, lands below it, or contacts one side. Include a photo with the door resting naturally against the frame.
Inspect the knob, lever, or handle without taking it apart. Record visible looseness, missing fasteners, or movement around the mounting area. If the hardware operates normally, include that detail too. It helps narrow the written request.
Now compare those observations with the visible frame conditions. A loose hinge is a hardware observation. A split beside the hinge is a frame observation. A latch missing the strike is a movement observation. Keeping those statements separate prevents an early diagnosis from shaping the entire request.
Don’t order replacement hardware based only on a photo or quick inspection. The professional may need measurements, door details, and a closer view before defining the parts and work involved.
If you’re deciding who can fix door frames, send the full list rather than choosing a trade from one symptom. Fix Pro San Diego matches homeowners with licensed, independent local repair pros. You can also confirm a professional’s license details through the CSLB license check.
Photograph the full opening before requesting repair
A useful photo set moves from wide views to close details. Start with one picture showing the complete doorway, nearby wall, and floor. Take that image from both sides of the opening when access allows.
Next, photograph the entire frame straight on. Include the top, both jambs, and the bottom of the opening. Open the door for another complete view. This makes the hinge positions and covered frame surfaces visible.
Then take close photographs of every marked trouble spot. Keep the camera level and include a nearby edge for context. A close image of a crack means little if the professional can’t tell whether it sits near a hinge, latch, or corner.
Add scale without blocking the damage. Hold a ruler beside a gap or missing section, then take a second photo without it. Write the measurement in your notes. Don’t insert anything into a gap to measure hidden depth.
Name the files in a useful sequence, such as “full opening,” “hinge side,” “latch side,” and “threshold.” Match close images to the numbered notes you created earlier.
For an Escondido appointment, include practical arrival details with the request. Mention the correct driveway, gate, unit, or building entrance. If approaching from Interstate 15 or Centre City Parkway changes which entrance the professional should use, explain that clearly.
Send the photos with a short description of the door’s normal use and current movement. Mention any access limits around the opening. Our broader guide explains door repair cost and scope questions without assigning a price to your specific project.
Good documentation doesn’t replace an on-site review. It gives the independent professional an organized picture before discussing the requested door repair frame work.
When to call us
Hand the work to a professional when the frame has multiple damaged areas, the door won’t operate normally, or the repair scope remains unclear. Fix Pro San Diego connects Escondido homeowners with licensed, independent local pros and performs no door work itself. Call us at (858) 400-4611 and we’ll match you with a local pro who quotes the job before starting.
Would you rather hand this one to a pro than do it yourself? Call (858) 400-4611.
Request a quote