A grout repair request can become unclear before a pro sees the surface. A few close-ups may show damage, but they rarely show its location or extent. The right photo set helps a tile pro understand what you want inspected and prepare a comparable proposal.
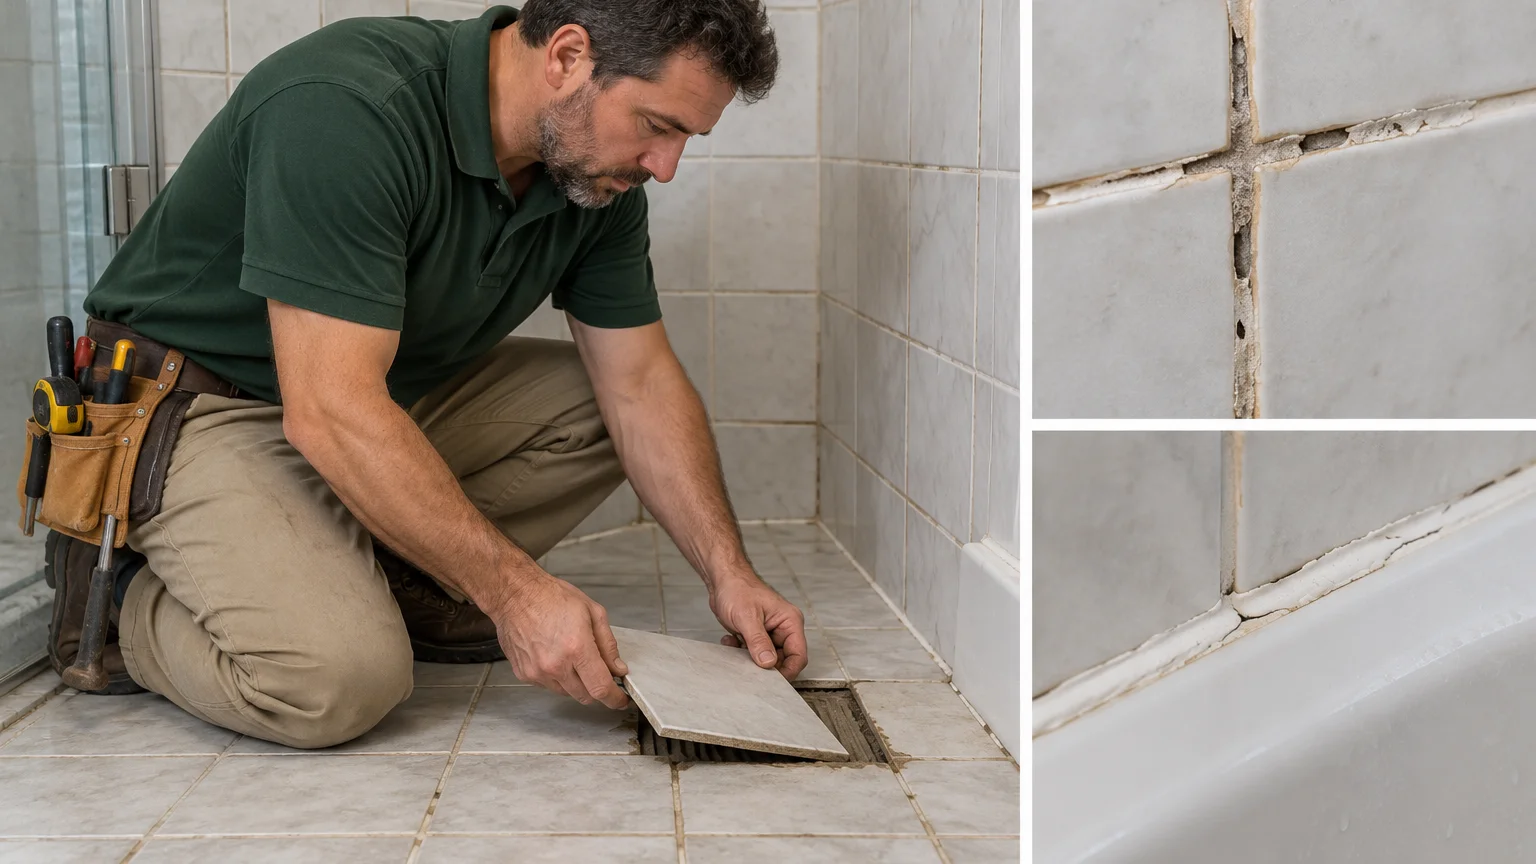
Map grout lines by room, wall, and floor
Start with photographs that establish the room. Take one picture from the doorway, then photograph each affected wall or floor area. A pro should be able to connect every close-up to a specific surface.
Name the room and surface in your notes. “Upstairs bathroom” is more useful than “bad grout.” “Tub wall opposite the door” is clearer still. For floors, identify a fixed reference such as the vanity, doorway, or cabinet run.
Use this sequence for each area:
- Take one wide room photograph.
- Take one full-surface photograph.
- Take a closer picture of the affected grout lines.
- Add one detail image with a familiar object for scale.
- Label the images by room and surface.
Photograph the full path when damaged grout crosses several tiles. Don’t send isolated close-ups that hide where one line ends. If separate patches appear on opposite walls, record them as separate areas.
San Diego County requests often cover more than one room. A homeowner in Chula Vista might have bathroom floor grout and a kitchen backsplash concern. An Escondido request might include two bathrooms. Keep each room in its own photo group so the proposals don’t combine unrelated surfaces.
A simple area list also helps: “Bathroom 1 floor, Bathroom 1 tub wall, kitchen counter edge.” This list doesn’t decide the repair. It gives the pro a clear map for reviewing your images.
If you’re still deciding how much surface belongs in one request, read the guide to one bathroom wall versus the full room. That decision should follow the visible layout, not a stack of unlabeled detail shots.
Separate worn grout from loose tile and caulk
Grout, tile, and caulk can appear together in one photograph. They shouldn’t be treated as the same photo subject. Show each condition separately, then include a wider image that shows how they meet.
Photograph grout lines straight on. Capture missing sections, cracks, or worn areas without covering them with labels. Put your description in the filename or accompanying message instead.
Next, photograph every tile that moves, sounds different, has a chip, or has a visible crack. State what you noticed without declaring the cause. For example, write “lower tile moves when pressed” instead of guessing what’s behind it. A photograph can document the visible condition, but it can’t confirm concealed damage.
Caulk usually appears where surfaces change direction or materials meet. Photograph those joints separately. Describe them as caulk only when you know they’re caulk. Otherwise, call them “corner joint,” “tub edge,” or “counter joint” and let the pro identify the material.
Don’t ask a pro to select a filler for a cracked tile from one close-up. A tile crack, damaged grout line, loose tile, and open joint may lead to different proposals. The photographs should expose those differences, not force an early repair choice.
This separation also helps when searching for grout and tile repair near me. You may need grout work, tile work, caulk work, or a combined scope. Our tile and grout repair service connects San Diego County homeowners with licensed independent local pros who review the requested work.
For bathroom joints, the guide to shower caulk versus grout repairs can help you label each photo without diagnosing the underlying condition.
Record color, width, and spare materials
Color photographs change with lighting, shadows, and camera settings. Take one image with the room lights on and another in neutral daylight when available. Don’t apply filters or automatic color effects before sending the files.
Include nearby grout that still has the appearance you want. The repair area alone won’t show how it compares with the rest of the installation. A reference photograph should include several tiles and uninterrupted grout lines.
Add a ruler beside the grout line for one close-up. Keep the ruler on the tile surface rather than pressing it into the joint. Record the visible width, but let the pro confirm measurements before preparing the final scope.
Your notes should also cover:
- The room and exact surface
- The color name, if you have the original packaging
- Any product label you can photograph
- The number of spare tiles you have
- The size and markings of those spare tiles
- Whether the spare material appears to match the installed surface
Photograph the front and back of a spare tile. Include the entire piece and any printed markings. Don’t state that it’s an exact match unless you’ve confirmed that. Age, lighting, and surface wear can make installed materials look different.
If you don’t have a product name or spare material, say so plainly. That’s more helpful than selecting a color from a screen. The pro can then account for the missing reference when discussing options.
Our guide to matching grout color around older tile explains how to organize those comparisons. It also keeps color matching separate from the question of how much grout belongs in the proposal.
Compare one area with the rest of the surface
One damaged line doesn’t reveal the condition of the surrounding field. After photographing the main concern, capture nearby grout that looks different. Then show the same surface from farther away.
For a shower wall, photograph the lower, middle, and upper sections. For a floor, take images near the doorway, center, and perimeter. For a backsplash, show the affected section and the adjoining counter run. These are comparison views, not proof of a particular cause.
Keep the camera angle consistent when possible. Similar angles make differences easier to see. Avoid flash glare that hides the joint. If a reflection covers part of the surface, move slightly and retake the image.
Include unaffected areas too. A pro comparing a spot repair with a broader grout scope needs to see both. Photographing only the roughest section can make every proposal depend on a different assumption.
Count and label visible areas instead of estimating the repair method. “Three separated sections on the floor” is a useful note. “The entire floor needs replacement” is a conclusion that photographs alone may not support.
For larger surfaces, sketch a simple rectangle representing the wall or floor. Mark each photographed area with letters. Match those letters to filenames such as “floor-A-close” and “floor-A-wide.” This works well when a bathroom has repeating tile patterns.
The next decision is whether the request covers an isolated area or a broader grout field. The guide to a spot fix versus full regrout explains that scope question. Use your comparison photos to support that conversation instead of trying to settle it from one image.
Send the same photo set with every proposal request
Proposal comparisons only work when each pro receives the same information. Sending five images to one person and fifteen to another creates different starting points. Use one folder, one area list, and one written request for every proposal.
A practical photo set includes:
- One doorway view for each room
- One full view of every affected surface
- Close-ups of each grout concern
- Separate images of loose or damaged tiles
- Separate images of caulk or unidentified corner joints
- One ruler photograph showing grout width
- Reference views of nearby grout
- Photographs of spare tile or product packaging
Add short notes about what you observed. Mention movement, visible cracks, missing material, and the location of each area. Don’t claim that a photograph proves moisture, concealed damage, or a specific repair method. Ask the pro what must be checked in person.
Your request should also state what you want included in the proposal. Ask each pro to identify the rooms, surfaces, grout areas, tile work, caulk work, preparation, and materials covered. If something isn’t included, ask that it be listed separately.
Don’t ask only, “How much to fix this?” That question leaves the scope open. A clearer request says, “Please quote the labeled grout areas and list any tile or caulk work separately.” Fix Pro San Diego doesn’t set prices or perform tile work. The independent pro prepares the proposal, performs the accepted work, and receives payment directly.
Before hiring, you can check a contractor’s license information through the California Contractors State License Board. You can also use our guide to comparing tile repair companies in San Diego when reviewing each written scope.
Save the original files until the work is settled. Cropped copies are useful for detail, but the uncropped views preserve location and context.
When to call us
Hand the work to a pro when the scope includes several surfaces, loose tile, uncertain joint materials, or color matching around older tile. Call us at (858) 400-4611 and we’ll match you with a local pro who quotes the job before starting.
Would you rather hand this one to a pro than do it yourself? Call (858) 400-4611.
Request a quote