You’ve patched a hole in your drywall, the surface is smooth, ready for paint. But then you realize: the surrounding wall has a distinct texture, and your patch sticks out like a sore thumb. In San Diego homes, getting a flawless finish often means perfectly matching that existing drywall texture, a step that’s far more challenging than it looks.
Why texture matching is the hardest part of drywall repair
Many San Diego homeowners can handle a basic drywall patch. You cut the hole, install the backing, put in a new piece of drywall, tape the seams, and apply joint compound. It’s a satisfying process until you get to the final, crucial step: texture. This is where most DIY attempts fall short. Unlike simply spackling a small nail hole, larger drywall repairs expose the need for a truly blended finish. If the texture doesn’t match, the repair area will always be visible, no matter how perfectly you paint over it.
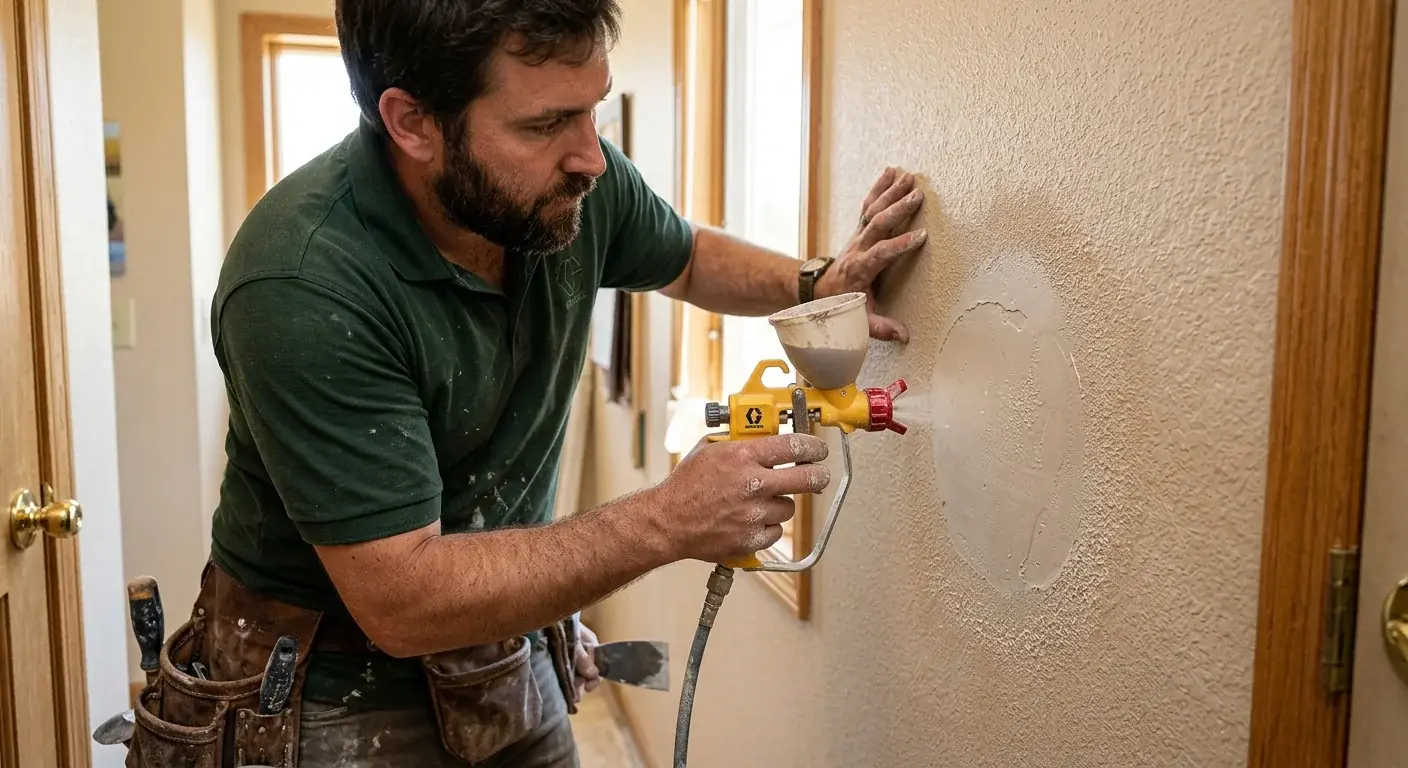
The difficulty lies in replicating the exact pattern, depth, and consistency of the original texture. Factors like the type of texture (orange peel, knockdown, smooth), the age of the existing texture, the tool used, and even the application technique all play a role. A professional handyman understands these nuances and knows how to feather the new texture seamlessly into the old, making the repair disappear. They don’t just cover the patch; they integrate it. This often means carefully adjusting air pressure, material consistency, and spray patterns. When tackling complex home repairs like this, it’s wise to verify a contractor’s license, which you can do at the CSLB website: cslb.ca.gov. For comprehensive solutions beyond simple patching, consider our dedicated drywall repair services.
Orange peel: how to blend a patch into San Diego’s most common texture
Orange peel is probably the most common drywall texture you’ll find in San Diego homes, especially in newer constructions from the 80s, 90s, and early 2000s. It gets its name from its subtle, dimpled appearance, much like the skin of an orange. This texture is popular because it’s durable, helps hide minor imperfections in the drywall, and provides a neutral backdrop for any interior design.
Matching orange peel requires a fine touch. The key is to achieve the right “splatter” size and density.
- Material consistency: The joint compound used needs to be thinned down significantly, often to the consistency of pancake batter or slightly thicker, depending on the desired texture. Too thick, and you’ll get heavy blobs; too thin, and it’ll run.
- Application method: Most pros use a texture sprayer with a fine tip, applying the mixture with quick, overlapping passes. The distance from the wall and the air pressure are critical. Spraying too close creates a heavier texture, while spraying too far results in a finer, more dispersed pattern.
- Feathering: This is the technique of gradually reducing the amount of texture as you move away from the patch, blending it into the existing wall. You want to avoid hard lines where the new texture stops. Instead, it should softly fade into the surrounding surface. This careful blending is what makes the repair invisible, something a DIYer often struggles with. For deeper dives into fixing wall damage, check out our guide on how to patch a drywall hole in San Diego.
Knockdown: the two-step process most DIY attempts miss
Knockdown texture is another popular choice in San Diego, particularly in custom homes or those with a slightly more contemporary or Mediterranean feel. It starts similarly to orange peel but involves an extra step that gives it its distinctive flattened, stucco-like appearance. This two-step process is where many DIY projects go wrong.
First, a texture material (usually a slightly thicker mix of joint compound) is sprayed onto the wall, creating raised “stalactites” or blobs. This is often a heavier application than orange peel. The crucial second step, the “knockdown,” happens after the texture has partially dried, but before it’s fully hardened. A wide, flat knife or trowel is then lightly dragged across the surface, flattening the peaks of the wet texture. This creates those characteristic smooth, irregular islands against a slightly textured background.
The timing of the knockdown is everything. If you knock it down too early, the texture will smear or disappear completely. Too late, and it won’t flatten properly, leaving sharp edges or tearing the partially dried material. The angle and pressure of the knockdown knife also significantly impact the final look. Achieving that natural, irregular pattern without distinct trowel marks or visible seams at the patch requires practice and a keen eye. It’s a delicate balance that separates a professional finish from a noticeable repair.
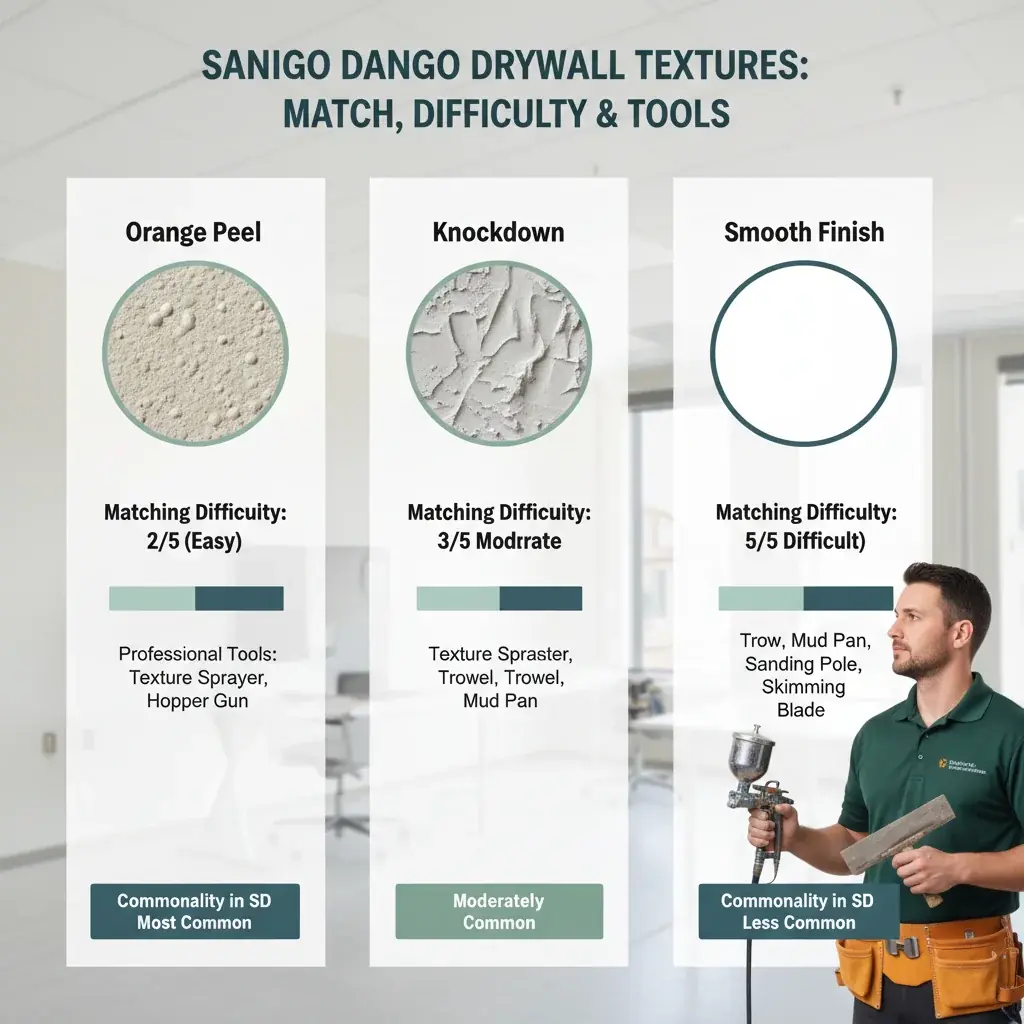
Getting a perfect smooth finish (and why it costs more)
While orange peel and knockdown textures are common, many San Diego homeowners prefer the clean, contemporary look of a smooth drywall finish. While it might seem simpler because there’s “no texture” to match, achieving a truly flawless smooth wall is arguably the most difficult and labor-intensive option. This is precisely why it often costs more than textured finishes.
With a smooth finish, there’s absolutely nowhere for imperfections to hide. Every tiny bump, dip, screw pop, or tape line will be glaringly obvious under paint and light. To achieve perfection, the drywall installation itself must be impeccable. Joints need to be perfectly taped and mudded, screws must be set just right, and the entire surface needs multiple thin coats of joint compound, each sanded meticulously. Often, a skim coat, a very thin layer of joint compound applied over the entire wall surface, is necessary to ensure uniform smoothness. This process is then followed by a high-quality primer and often requires a higher sheen paint to really showcase the smooth surface. If you’re tackling interior painting after a smooth finish repair, the prep work is paramount.
The increased cost reflects the significant skill, time, and attention to detail required. It’s not just about applying compound; it’s about painstaking sanding, repeated inspections with strong light, and a commitment to flawlessness that other textures simply don’t demand.
Aerosol cans vs hopper guns: what a pro uses
When you’re attempting a DIY texture match, you might grab an aerosol texture spray can from the local hardware store. For the smallest patches, these cans can offer a passable solution. They’re convenient, inexpensive, and require no special equipment. However, they come with significant limitations. The spray pattern is often inconsistent, the material tends to clog, and it’s incredibly difficult to match the specific “splatter” size and density of existing wall textures, especially larger patterns like those found in San Diego homes. The resulting texture can look artificial and stand out.
A professional handyman, on the other hand, almost exclusively uses a texture hopper gun (also known as a drywall texture sprayer) or a similar professional airless sprayer setup. These tools offer a level of control and consistency that aerosol cans simply can’t match.
- Hopper gun: This device consists of a hopper that holds the thinned joint compound, which is then fed into a spray gun connected to an air compressor. Pros can adjust the air pressure, nozzle size, and material consistency to precisely control the splatter pattern, from a fine orange peel to a heavier knockdown. This versatility allows them to mimic a wide range of existing textures.
- Consistency and volume: Hopper guns handle larger volumes of material, allowing for consistent application over larger repair areas and ensuring the texture doesn’t change halfway through the job.
- Feathering control: The ability to finely tune the spray makes smooth feathering much easier, which is critical for making repairs disappear.
While an aerosol might fix a tiny nail hole, anything beyond that demands the precision and power of a professional sprayer to truly blend new work with existing walls. For details on what goes into professional work, check out our insights on drywall repair cost in San Diego.
When a small patch needs a full wall retexture to look right
Sometimes, even with the best tools and techniques, matching an existing drywall texture perfectly can be incredibly challenging. This is especially true for older homes in San Diego where the original texture might have been applied decades ago using methods or materials that are no longer common. The texture might have faded, been painted over numerous times, or simply be unique to that original application.
In these situations, trying to match a small patch can result in a noticeable difference, no matter how skilled the repair. The new texture, even if it’s very close, might react differently to paint or lighting than the aged original. When a patch stands out too much, the most effective solution for a truly invisible repair isn’t just fixing the patch but retexturing the entire wall or even the entire room.
This might sound like overkill for a “small” hole, but it’s often the only way to ensure a uniform, flawless finish that disappears completely. A full wall retexture ensures consistency across the entire surface, providing a fresh, cohesive look. While this adds to the project’s scope, it guarantees the best possible outcome, preventing that perpetually “repaired” look. A skilled handyman can assess the existing texture and advise whether a spot match is feasible or if a full retexture is necessary for a perfect result.
When to call us
Drywall texture matching is an art and a science, often requiring specialized tools and extensive experience to get right. If you’ve got a drywall repair that needs to disappear seamlessly into your San Diego home’s existing texture, don’t settle for a noticeable patch. Our team has the expertise to perfectly match orange peel, knockdown, smooth, and other textures. Call us at (858) 400-4611 for a same-day estimate.
Want a flat-rate quote for this instead of doing it yourself? Call (858) 400-4611.
Request a quote