The cabinets are gone, and the wall looks unfinished. Baseboard, scribe, and side casing stop at a raw rectangle where the built-in sat. That leftover outline is the job: restore the trim so the room reads as one space again, not a missing box.
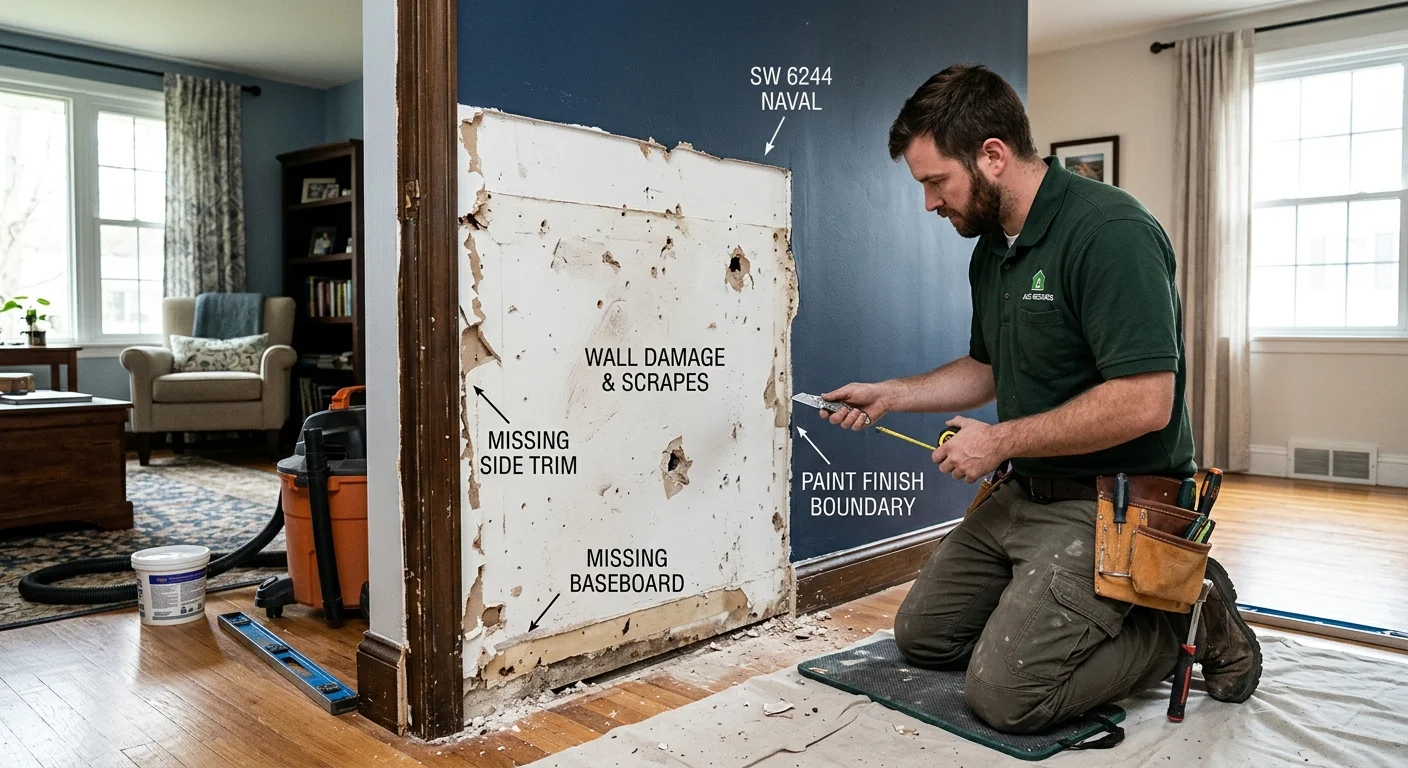
Map missing trim around the former cabinet
Start at the floor and walk the old cabinet footprint. Every place wood used to hide a joint is now a gap. Mark those gaps on paper or in photos before anyone fills them.
On the floor you will usually find a break in the baseboard. Built-ins in Clairemont, Serra Mesa, and Allied Gardens ranch houses often ran to the floor with a toekick instead of a full base. When that box comes out, the room baseboard does not continue through. You get two dead ends and a stretch of bare drywall or plaster at floor height. In a Chula Vista or National City townhouse, the same gap often sits over tile that never ran under the toekick.
On the sides, look for scribe and filler. Scribe is the thin strip that hid the wavy gap between the cabinet and the wall. Filler is the wider piece used against a fridge, a door jamb, or an out-of-square plaster wall in North Park or Golden Hill. Neither piece is the same profile as room casing. If you nail leftover cabinet scribe onto a wall run, it will look like a skinny stripe that never belonged there.
If uppers came down, check the ceiling line. Some Pacific Beach and Mission Beach galleys had a light rail under the uppers and a small crown or strip against the soffit. Encinitas and Carlsbad production kitchens more often had a closed soffit with no extra molding. El Cajon and Lakeside ranches may have had open tops with no crown at all. Write down what actually stopped, not what a catalog says a kitchen should have.
Also map returns. A return is the short piece that turns the trim back to the wall at the old cabinet end. Outside corners, inside corners, and the meeting with a door or window casing all need a note. In older San Diego plaster homes the wall is rarely plumb, so the old scribe was often cut on site to follow the wave. A square cut of new stock will not hide that.
Circle each run: start point, stop point, and what it meets. Floor, wall, ceiling, window, remaining cabinet. That map is what a carpentry and trim pro quotes against. Without it, people price a small patch and then find a full wall of interrupted base. If you searched trim work near me after the demolition, this map is the thing that search never gave you.
If other cabinets stayed in the room, mark those too. A remaining run of kitchen cabinet repair work is a different job from filling the hole the removed unit left.
Separate wall damage from carpentry work
The empty rectangle is two jobs that look like one. Carpentry puts wood back. Wall work puts the surface back. Mixing them in one vague request is how quotes miss half the damage.
Nail holes and screw holes along the old cabinet sides are the easy part. Harder finds are common after San Diego built-ins come out. Construction adhesive leaves ridges or tears the paper face of the drywall. Paint stops in a hard line where the cabinet protected the wall for years. In sunny rooms in Point Loma or La Jolla, the exposed paint has often faded while the hidden band stayed dark. In inland houses in Escondido or El Cajon, that band can also show a different sheen from heat and dust, not just color.
Torn drywall paper is not a trim problem. Exposed gypsum soaks paint differently. A trim carpenter in San Diego can set new base and casing, but a raw gypsum strip still prints through unless it is sealed and skimmed first. Plaster in South Park, University Heights, and older Chula Vista bungalows behaves differently again. Do not treat plaster the same as a Mira Mesa drywall patch.
Do not try to read wall movement, rot, or hidden leaks from a phone photo. A crack near the old cabinet can be old settlement, a plumbing nick, or just paper torn by a pry bar. A pro on site can look. A picture cannot confirm it.
Finish boundaries matter as much as holes. Where the cabinet met the wall, you often have three paint systems: wall color, cabinet color, and the original color under the box. Feathering one touch-up over that stack usually fails. Plan the wall repair as its own scope: scrape adhesive, seal torn paper, skim the band, prime, then paint the full wall plane, not a postage stamp.
In the City of San Diego, kitchen or bathroom cabinet relocation in a single-family home, duplex, or townhouse is listed as work that does not need a building permit, except on designated historic resources or in historic districts. That note comes from the city’s development services materials, and it is about the cabinet move inside city limits. It is not a blanket pass for Encinitas, El Cajon, or unincorporated county land. It is also not permission to skip a permit if the work later touches electrical, plumbing, or structure. Confirm with City of San Diego Development Services or with your own city’s desk before you assume the finish work is exempt.
Homes built before 1978 can have lead paint on trim and walls. Disturbing that paint is a different process. The EPA Lead-Safe Renovation, Repair and Painting program is the federal rule to read before anyone sands or heats old coatings.
Record profile, width, corners, and finish
Before anyone buys stock, record the wood that is still on the wall. The match is in the details, not in the word baseboard.
Measure width and height of each remaining piece in inches, not a guess. Note the thickness. Note the reveal: how far the profile steps off the wall. A ranch 1x4 in a 1960s Kearny Mesa hallway is not the same as colonial casing in a newer 4S Ranch kitchen. Neither is the skinny shoe under many coastal condos.
Photograph the end of a piece if you can do it without prying. The cut face shows hollows, steps, and the order of curves. A phone shot from ten feet hides all of that. Get a close shot of inside corners and outside corners. Coped joints and mitered joints fail in different ways, and they need different replacement cuts.
Write down the finish. Painted trim can often take a new piece if you paint the whole wall. Stained oak, common in 1980s and 1990s Scripps Ranch and Rancho Bernardo kitchens, is harder. Grain, stain color, and sheen have to land next to a board that has yellowed in inland sun. If the remaining cabinets are oak and the room trim is painted pine, record that split. Do not assume one product covers both.
Check whether leftover cabinet parts are even usable. A scribe ripped off the cabinet side may still have a good face. It still may be the wrong profile for a wall run. Reattaching cabinet trim to the wall is only a fit when that piece was always wall trim, not a cabinet edge. Most of the time you are replacing room trim, not gluing the old scribe back on.
If a door or window casing was notched around the built-in, measure that notch. The casing may need a full length replacement rather than a small insert, especially if the profile is small and the notch is deep.
Bring those notes when you request carpentry help. Profile, width, corner type, and finish cut the guesswork. They also keep the quote aimed at trim repair after cabinet removal, not a generic fix-the-wall visit.
Compare patching with replacing longer sections
A short patch looks simpler until you see the joint. New wood next to old wood shows every mismatch in profile, paint, and gap at the floor. People looking for baseboard repair near me after a cabinet pull are usually staring at that joint, not at a catalog length.
Patching a short run can work when all of these are true. The missing length is small. You still have a matching offcut or a salvage piece from the same wall. The profile is simple. The finish is paint, and you will paint the whole wall. Even then, the splice should fall in a low-notice spot, not at eye height in the middle of a Clairemont dining wall.
Replacing a longer section is often cleaner. Run new base from corner to corner through the old cabinet bay. The joints hide in the corners, where they already belong. That is the same logic as choosing to repair or replace damaged baseboard after a hit or a leak: the visible seam is the real cost.
Coastal and inland wood do not move the same way. Encinitas and Imperial Beach hold more moisture. El Cajon, Alpine, and Ramona run drier. A tight splice that looks good in a mild week can open in a Santa Ana stretch if the new piece was stored wet and the old piece has been baked for years. A longer replacement lets the new run move as one piece.
Do not split a large job into tiny tickets to dodge licensing. California’s minor-work exemption under Business and Professions Code section 7048 applies to casual, minor, or inconsequential work with an aggregate price under $1,000 for labor, materials, and all other items, and only when the work does not need a building permit. It does not apply when the work is part of a larger operation, when contracts are divided to evade the law, when someone advertises as a contractor, or when they employ others to do the work. CSLB also tells consumers that licensing is required for projects that need a permit, use employee labor, or cost $1,000 or more. Price alone is not permission.
If the wall repair and the trim run together as one project, treat them as one total. A skim, a full wall of paint, and a corner-to-corner base run can add up. Verify any license number on CSLB’s license check before you sign.
Photograph adjoining trim before requesting repair
Photos are for matching, not for remote diagnosis. Shoot the adjoining trim so a pro can see profile and layout. Do not ask anyone to declare hidden damage from those shots.
Take a wide shot of the whole empty bay, floor to ceiling, with a tape in the frame. Then take tight shots: left dead-end of the baseboard, right dead-end, each side wall, the ceiling line, and any casing that was cut around the box. Include one shot of an intact corner elsewhere in the same room so the profile is clear.
Shoot in daylight without a heavy filter. Flash flattens the steps in a profile. A window in a south-facing Mission Hills room will show sheen better than an overhead kitchen can.
Photograph the floor gap. Some San Diego homes have tile that stops under where the toekick sat. Others have oak strip that was never finished under the cabinet. That changes whether the new base needs a shoe, a reveal, or a floor repair before trim goes back. Do not hide that surprise in a quote request that only shows the wall.
Keep a straight-on shot and a raking-light shot of the paint line. The raking shot shows ridges of adhesive and torn paper. Those belong in the wall-repair scope, not in the linear feet of trim.
If you already have a folder of repair photos from other rooms, keep this set separate. Mixing a bathroom vanity pull with a hallway built-in pull just confuses the map. A clean set is also what you want if you photograph repairs before you request quotes on more than one trade.
Bring the map, the measurements, and this photo set when you call. Fix Pro San Diego is a referral service. It matches you with licensed, independent local handyman pros. It does not do the carpentry, own the tools, or set the price. The pro you are matched with quotes the work you actually have: missing runs, wall damage, and finish, not a guess from one blurry picture.
When to call us
Hand this off when the missing trim spans more than a short matching patch, when wall paper is torn, or when stained millwork has to meet remaining oak. A matched local pro can separate the carpentry from the wall repair and quote both before anyone cuts a board. Call us at (858) 400-4611 and we’ll match you with a local pro who quotes the job before starting.
Would you rather hand this one to a pro than do it yourself? Call (858) 400-4611.
Request a quote